Sunday, July 29, 2012

Giveaway Winners and Ripley's Believe It Or Not Recycling

Hey, friends! I just got back from Myrtle Beach in time to randomly pick the three winners of the "Keep Calm and Teach On" giveaway. The three winners are:
#6 - Susan Warren
#40 - Erin Franklin
#19 - Malinda Gorham

Congrats! And thanks to all the wonderful, earth-friendly tips you all gave for making a green difference in the classroom. I hope to compile them all in a small ebook perhaps.

So, at Myrtle Beach you can find Ripley's Believe or Nor museum. It was my second time going, and I always enjoy it. I guess the people highlighted there make me feel a little normal!

There were many awesome pieces of art that involved recycling. It didn't occur to me to take pictures until the end, but here's what I got.

Made completely out of seashells

Made out of 1st, 2nd, and 3rd place ribbons

I think this has a bunch of recycled metal and technology parts.

Maybe this will give me some inspiration for decorating my room with only recycled materials. This week I have got to begin!

Hope your week is peachy-green!


Sunday, July 22, 2012

Keep Calm and Teach on Recycling Craft & Giveaway

Right now most of us are hopefully pretty relaxed, but sooner than we wish, this phrase will become very fitting for us teacher folks!


These are some containers I made by recycling Christmas tins. Cool, huh? If you'd like to win one of these, scroll down and enter my giveaway. If you'd like to make your own and keep Christmas tins out of landfills, just keep on reading!

These are the "before" pictures for the above containers. I got these for $1 at Goodwill, but I'm sure you can just search through your attic and find a few.

What else you might like to have on hand:
1) Rust-oleum Clear Enamel
2) 3M Super 77 Adhesive (Caution: This sticky stuff will not leave you alone!)
3) Rust-oleum Universal Primer & Paint (amazing stuff)
4) Some kind of paper to wrap around the tin. I printed out digital scrapbooking paper from JW Illustrations Jungle Pack.
5) Keep Calm & Teach On Graphics (No worries, I have them already made for you at my TpT store here. :))

What to Do:
Apply several coats of Primer/Paint to the tin.
I kept the lid on because I'm worried about the paint chipping everytime you close the lid. But by doing so, you will still see the Christmas background when you open the lid.

Paste the graphic on the lid.
To do so:
1) Download the graphics from my TpT store or make your own.
2) Measure the diameter of your lid.
3) Insert your graphic into Power Point or whatever design program you're familiar with for resizing.
4) Resize your graphic to a little bit less than the diameter of your lid.
5) Print and paste (I used the 3M Super 77. I tried Mod Podge and had serious elephant skin issues because the paper was too thin. But you Mod Podge experts can probably do it fine.)

Add paper to the side.
I printed this paper and cut it into several strips based on the dimensions of the tin. I like using stripes because you can line up the strips fairly well without telling where one strip ends and one begins.

Add a protective sealant coat.
You could probably use Mod Podge once the glue has completely dried, but I took no chances. I added several coats of Rust-olem clear enamel. The more you coat, the glossier it gets. Any type of acrylic glaze or sealant I'm sure would do great.

Ta-dah!! This tin makes me happy.

GIVEAWAY:
So, if you would like one of the three tins above mailed to you (they are super cute but not perfect in condition):

* Do one OR MORE of the following and comment on this post:

4) Write one thing you do or are planning on doing to reduce/reuse/recycle in your classroom.
5) Link as many posts of your own that involve recycling here at this blog by clicking on the header "By Area" or "By Material."

* Be sure to list each action as a separate entry.

* Three randomly chosen winners will be announced next Sunday night, July 29th, 2012.

* Winners have 48 hours to claim their prize.

 
Keep calm and RECYCLE on!

Wednesday, July 18, 2012

Playing with Plastic

This year I want to do a green theme in my classroom, not just thinking of the color but also of decorating with only recycled materials.

So right now I'm continuing to work with plastic. Plastic and I have a love/hate relationship. It's such a harm to the planet, and yet to enjoy many things, I have to encourage its production.:( But lately, plastic and I are really having a good time together as I've discovered how much can be done with it.

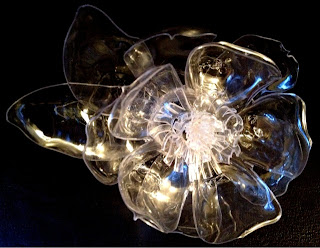
The following items were made using scissors, E-6000, tweezers, plastic bottles, and most importantly - a heat gun.

Flower Ring. all plastic


Lots of Flowers

My Favorite One

Beads!

I have a lot of time on my hands, right? Well, it's summer, and I'm a teacher, duh! :)

So, I'm looking for recycling ideas for classroom management and setup. Could you please comment with a tip for me? Thanks a bunch!

"Green is the new black."

Tuesday, July 3, 2012

Plastic Bottle Fantasy Flower 1 Tutorial

Hey guys! I'm such a weird person, but it's summer break, and what am I doing? Having fun with plastic bottles! I had no idea all that can be done with them. I've been making various fantasy flowers out of them (fantasy because they're not anatomically true to any real flower :P), so I'd like to show you how I made one that could almost be called a chrysanthemum.


This was made from a two-liter bottle of Sprite Zero. For this tutorial, I'll have to use one that my husband crushed I guess to show his manliness. :P


Here's what you need:


1) Two-liter bottle
2) E-6000 glue or any strong adhesive glue
3) Knife/scissors
4) Two Hershey kisses - NOT optional :P
5) Small cap from a hairspray bottle or other similar bottle
6) White Satin Rustoleum Universal Primer & Paint in One (or something similar if you want to paint your flower)
7) Acrylic paint if you want to paint
8) Double-sided tape if you want to stick your flower on a gift box, wall art, door sign, etc.

Assembly Instructions

1) Cut the top neck off and the bottom port off of the bottle (they actually have lines that make it easy to cut evenly).


2) Take the bottle neck and cut into MANY petals. Push the petals down flat.


3) Take the bottom portion and cut into many petals also. You will find that when you push them down, they twist into odd angles. This works to your advantage because you can push the petals back up into flower-like cup of petals.

4) Take the small cap and cut into many petals also. Bend petals downwards a bit at different angles to give the petals a natural look.

5) Using a strong adhesive glue, glue the bottom into the center of the bottle neck.


6) Next, glue the bottom of the small cap into the center.


7) Eat the two Hershey kisses (yes, eat them! You deserve it!) Then, wrap the two paper tails inside the aluminum and form a circular disc. Glue this into the center.


8) Optional: Spray a coat of Rustoleum's Primer & Paint on the flower.


9) Paint with acrylic brush-on paint or spray paint. I think in the future I would like to use an airbrush because it took FOREVER by hand.

10) Put double-sided tape on the bottom of the bottle cap on the underside of the flower and attach wherever you'd like - gift boxes, gift tins, wall art, your clothes........


Or maybe not! Unless you're going to a gypsy wedding! :P

If you have green ideas, please share! You can link them up by clicking on "By subject" or "By material" or you can just comment the URL here, and I'll link it for you! Thanks!

Livin' in a green world,

Related Posts Plugin for WordPress, Blogger...